Quick Facts
- Category: Robotics & IoT
- Published: 2026-05-18 21:07:21
- Rust 1.97 to Drop Support for Older NVIDIA GPUs and CUDA Drivers, Raising PTX and Architecture Baselines
- Safari Technology Preview 241: 10 Crucial Enhancements and Fixes
- Uber's Revenue Miss and Stock Surge: Why Wall Street Sees a New Company
- 10 Surprising Revelations After 3 Hours of Gaming on the OnePlus Nord 6's 9,000mAh Battery
- Go 1.26: New Features and Enhancements Explained
Introduction
Traditional intrusion detection systems (IDS) rely on signature-based methods, which only flag known threats. However, modern attacks often evade these static rules. The shift is toward context-aware detection, where the system asks not just does this match a known pattern? but does this behavior make sense in its environment?. This guide walks you through implementing a next-generation IDS using SnortML (a machine learning extension for Snort) and agentic AI—autonomous agents that adapt detection logic in real time.
By the end, you will have a practical setup that learns normal network behavior, flags anomalies, and evolves without constant human tuning.
What You Need
- A Linux server (Ubuntu 22.04 or later) with root access
- Snort 3.0+ installed (see Step 2)
- Python 3.8+ and pip
- Basic knowledge of network protocols and YAML configuration
- Sample network traffic (PCAP files) for training
Steps to Build Your Context-Aware IDS
Step 1: Assess Your Detection Goals
Before coding, define what context means for your network. Identify baseline behaviors:
- Normal traffic patterns: Which ports/services are typically used? What is the average packet size?
- User roles: Are certain machines always talking to specific external IPs?
- Time sensitivity: Do attacks often occur during off‑hours?
Document these parameters. This will guide your ML model and agent rules.
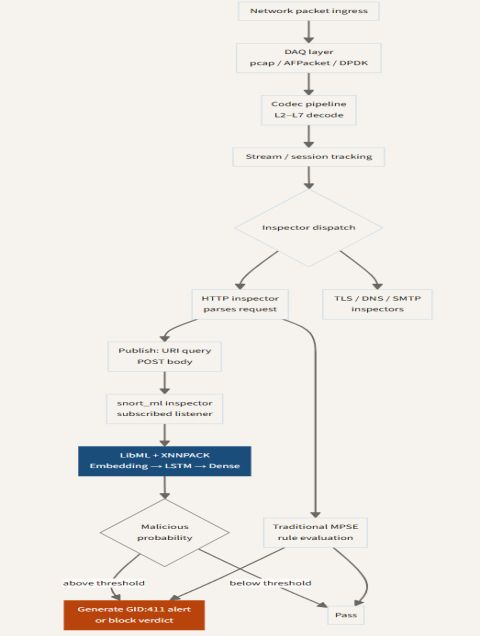
Step 2: Set Up Snort with Machine Learning Support
SnortML is a community extension that adds ML detection modules to Snort 3. Install it:
- Download Snort 3 source from snort.org and compile with
--enable-mlflag. - Clone the SnortML repository:
git clone https://github.com/snort3/snortml.git - Copy the provided
ml_snort.confexample to your Snort config directory. - Edit the config to point to your initial training data (PCAP files). Set
ml.model_pathto a directory where models will be saved. - Test the setup:
snort -c /etc/snort/snort.lua -i eth0(replace with your interface).
Step 3: Integrate Agentic AI Components
Agentic AI refers to autonomous scripts or microservices that adjust detection rules based on recent alerts. We'll use a lightweight Python agent:
- Create a Flask API that reads Snort’s alert log (
/var/log/snort/alert_fast.txt). - Define agent actions like: if false positives > threshold, relax rule X or if new anomaly pattern appears, create temporary rule.
- Deploy the agent as a systemd service so it runs continuously. Example service file:
  [Unit]  Description=Context-Aware Agent  After=snort.service
  [Service]  ExecStart=/usr/local/bin/agent.py  Restart=always  [Install]  WantedBy=multi-user.target
Step 4: Train the Machine Learning Model
Use labeled PCAP files (normal vs. attack) to train a baseline model. SnortML supports scikit‑learn models.
- Collect 1–2 weeks of clean traffic (no attacks) as normal data. Label it
0. - Acquire public attack datasets (e.g., CICIDS2017) and label as
1. - Run the training script:
python3 /usr/local/snortml/train.py --input normal.pcap attack.pcap --model random_forest - Place the generated
model.pklinto the path set inml.model_path. - Restart Snort to load the new model.
Step 5: Define Agent Policies for Autonomous Adjustment
In the agent’s configuration file (agent.yml), set rules like:
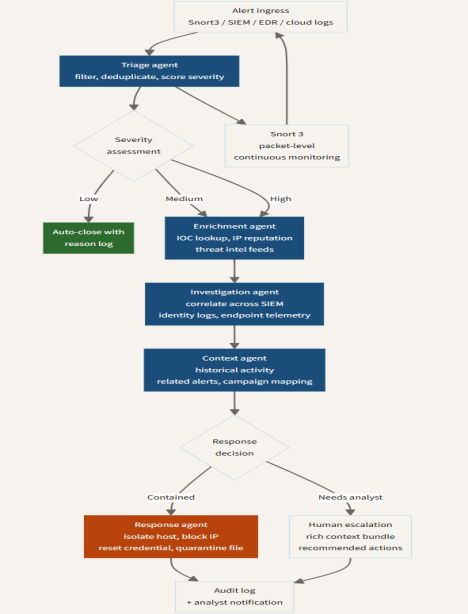
- False positive reduction: If an alert type fires <50 times in an hour but none are true positives, automatically disable that rule for 2 hours.
- Anomaly detection: If the ML model outputs a confidence score >0.85 for unknown traffic, create an ephemeral rule to block that source IP for 10 minutes.
Log every policy action to a separate file for auditing.
Step 6: Test and Tune the System
Run a controlled test:
- Inject a known attack (e.g., a port scan from Metasploit) into a test network.
- Verify that SnortML flags it as anomalous, the agent adjusts rules accordingly, and the attack is blocked or isolated.
- Check the agent log for actions: were false positive reductions triggered correctly?
Iterate: you may need to retrain the model with more varied data or adjust agent thresholds.
Step 7: Deploy in Production with Monitoring
For production use:
- Set up a dashboard (e.g., Grafana) to visualize alerts and agent actions.
- Create alerts for when the agent makes a significant change (e.g., rule disabled).
- Schedule weekly retraining with new traffic data to keep the model current.
Tips for Success
- Start small: Test on a single subnet before rolling out to your whole network. Agentic AI can behave unexpectedly if too many false positives are encountered.
- Maintain a human‑in‑the‑loop: Let the agent suggest changes but require manual approval for critical rules (e.g., blocking all traffic to a critical server).
- Log everything: Both Snort and the agent produce logs; feed them into a SIEM for post‑incident analysis.
- Update your threat intelligence: Regularly import new attack signatures from feeds like AlienVault OTX to feed the agent’s context.
- Name your policies: Use clear labels like “high_confidence_block” so you can quickly identify which agent action triggered a change.
By combining SnortML’s machine learning with autonomous agents, you transform your IDS from a static gatekeeper into an adaptive defender that understands context. The result? Fewer false positives, faster response to novel attacks, and a system that grows smarter over time.